How to: Configure SAML with ADFS
Last modified: Thursday September 02, 2021.
Configure ADFS as your SAML IdP for Alta Aware®.
Task — Configure ADFS IdP
- Open the ADFS Management console.
- In the left-hand panel, click
Relying Party Trusts . - In the right-hand panel, click
Add Relying Party Trust . - In the
Add Relying Party Trust Wizard , do the following: - Select the
Claims aware radio button and then clickStart . - Select the
Enter data about the relying party manually radio button and then clickNext . - In the
Display name field, type Alta Aware and then clickNext . - From the
Configure Certificate page, clickNext . - Select the
Enable support for the SAML 2.0 WebSSO protocol radio button. - In the
Relying party SAML 2.0 SSO service URL field, paste theACS URL you obtained from Alta Aware and then clickNext . - In the
Relying party trust identifier field, paste theEntity ID you obtained from Alta Aware and then clickAdd . - Click
Next . - Select the relevant access control policy and then click
Next . - From the
Ready to Add Trust page, clickNext and then clickClose . - Double-click the
Alta Aware Relying Party Trust . - In the
Alta Aware Properties page: - Click the
Signature tab. - Click
Add . - Select the certificate file (with a .cer extension) that you created by downloading it from your Aware deployment.
- Click
OK . - In the middle panel, right-click
Alta Aware and then selectEdit Claim Insurance Policy . - Click
Add Rule . - In the
Claim Rule Template menu, selectSend LDAP Attributes as Claims and then clickNext . - In the
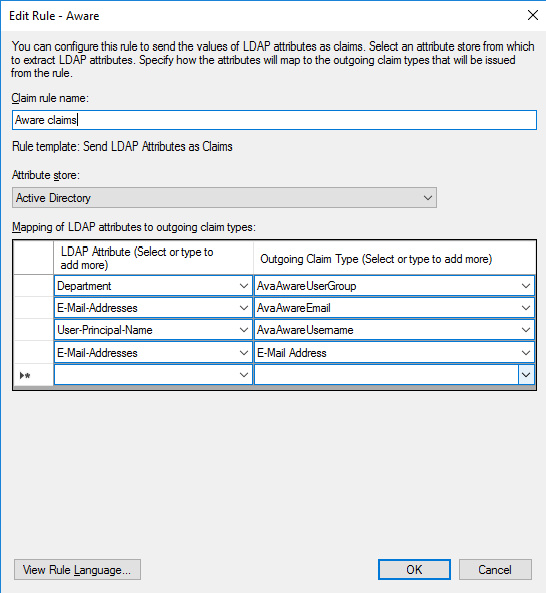
Claim rule name field, type Aware claims. - In the
Attribute store menu, selectActive Directory . - Configure your attributes, which are known as claims in ADFS:
- To configure the role attribute:
- In the
LDAP Attribute menu, select your preferred role attribute name. This can be an existing attribute or a new custom attribute you create using these instructions. The attribute value must correspond to at least one role in Alta Aware. For example, useDepartment . - In the
Outgoing Claim Type menu, type AvaAwareUserGroup. - To configure the login name attribute:
- In the
LDAP Attribute menu, selectUser-Principal-Name or your preferred login name attribute name. - In the
Outgoing Claim Type menu, type AvaAwareUsername. - To configure the email addressees:
- In the
LDAP Attribute menu, selectE-Mail-Addresses or your preferred user email attribute name. - In the
Outgoing Claim Type menu, type AvaAwareEmail. - Select the empty bottom row.
- In the
LDAP Attribute menu, again selectE-Mail-Addresses . - In the
Outgoing Claim Type menu, selectE-Mail-Address . - Click
Finish . - Click
Add Rule . - From the
Claim rule template dropdown, selectTransform an Incoming Claim . - In
Claim rule name , type Transform Name ID. - In
Incoming claim type , selectE-Mail Address . - In
Outgoing claim type , type Name ID. - In
Outgoing name ID format , selectUnspecified . - Click
Finish . - Click
OK . - To obtain the IdP metadata, go to your ADFS. For example, https://adfs.example.com/FederationMetadata/2007-06/Federationmetadata.xml.
An XML file will download to your computer which you will use to complete the next task. - Return to the task in How to: Configure Aware to enable SAML single sign-on.